In my post here, I had shown how to create a basic “Hello World” plugin that greets the user with a simple “hello world” message in the admin dashboard. Now, let me show you how to create a wordpress plugin that actually does something more useful. In this post, I shall discuss a plugin that restricts the number of login attempts a user can make to login to the admin dashboard of your wordpress site. It makes sense to do this to secure your dashboard from being broken into because an unauthorized user can do just about anything to your site if he manages to access your admin dashboard. This includes defacing your site, deleting your content and God knows what else!
We will call our plugin “Simple IP Blocker”. It will restrict the number of failed login attempts to a fixed number, say three. On the fourth attempt, the user will see an error message “IP address blocked”. The user will be blocked for the remainder of the day on which he made the three unsuccessful login attempts. He will be able to try again on the following day.
Now, let’s get down to the nuts and bolts of the actual plugin. The steps are:
- Create a folder for the plugin
- Create a PHP file for the code called index.php in that folder.
- Create a header for the plugin.
- Initialize the required constants.
- Create a database table through the activation hook.
- Create a function that hooks into wp_login_failed action.
It logs the failed attempts in the database table and blocks the IP address of the user. - Create a function that displays the logged data from the table.
- Hook the function in 7 into the admin_menu action so that the logged data can be displayed.
- Create a function that hooks into the login action ‘wp_authenticate’
that will give an error on trying to login in after ip is blocked. - Activate your plugin and test it.
Let us discuss these steps in detail:
1. Navigate to the wp-content folder in your wordpress installation. Go to the plugins sub folder in it.
Create a folder called “simple-ip-blocker”.
2. Create a blank file titled index.php using your text editor and save it in the folder created in step 1
3. Now, let’s create the header in the index.php file.
Print the following code in after the opening php tag in the index.php file:
<?php
/ *
* Plugin Name: My Simple IP Blocker
*/
?>
4. We will initialize the following constants:
<?php
global $wpdb;
define("LOGIN_FAILURES", 3);
define("IPBLOCKER_TABLE", $wpdb->prefix.'ip_blocker');
?>5. The above step will create a new line in the plugins section of your wordpress installation and define
the necessary constants.
We need to create a database table to log and count failed login attempts.
We will do this by using the “register_activation_hook” function.
We will create a PHP function named “simple_ip_blocker_create_table”.
In this function, we will write a “CREATE TABLE” MYSQL query. We will execute it by calling $wpdb->query
function on the global $wpdb variable by passing the query in it as a parameter.
We will then pass the “simple_ip_blocker_create_table” function name in the “register_activation_hook” function.
The code is as follows:
<?php

function simple_ip_blocker_create_table() {

     global $wpdb, $table_prefix;
     //mysql query $create_tab_query =
"CREATE TABLE IF NOT EXISTS `".IPBLOCKER_TABLE."`(
`id` bigint(20) NOT NULL AUTO_INCREMENT,
`ip_addr` varchar(20) NOT NULL, `attempts` int(4) NOT NULL,
`try_date` date NOT NULL, `is_blocked` tinyint(1) NOT NULL,
PRIMARY KEY (`id`) ) ENGINE=MyISAM DEFAULT CHARSET=utf8";

$wpdb->query($create_tab_query); }

register_activation_hook( __FILE__, 'simple_ip_blocker_create_table' ); ?>
Explanation of table structure:
id – PRIMARY KEY
ip_addr – IP address of user trying to log in.
attempts – number of failed logins per user.
try_date – date on which user s trying to log in.
is_blocked – flag too indicate whether the user is blocked or not.
6. Next, we will create a function that will hook into “wp_login_failed”. We will call
this function simple_ip_blocker_reset_bruteforce. This function will fire whenever the
user tries to login but fails. We will maintain a counter in the $_SESSION. Each failed
login will increment the counter. On reaching 3 attempts, the IP blocked flag, is_blocked
will be marked as 1 to indicate that the particular user is blocked for the remainder of
the day. However, the user can try again on the next day. Each attempt is logged in the
database table we created. For the first failed attempt, a new row will be created in the
table. For subsequent attempts, that row will be updated.For the third failed login,
the “is_blocked” field of that row will be updated to 1.
Check out the code below:
<?php
function simple_ip_blocker_reset_bruteforce() {
@session_start();
global $wpdb, $table_prefix;
if(!isset($_SESSION["brute_count"])) {
$_SESSION["brute_count"] = 1;
$query = "INSERT INTO ".IPBLOCKER_TABLE."(ip_addr, attempts, try_date, is_blocked) VALUES(%s, %d, %s, %d)";
$try_date = gmdate("Y-m-d");
$wpdb->query( $wpdb->prepare(
$query,
$_SERVER["REMOTE_ADDR"],
$_SESSION["brute_count"],
$try_date,
0
) );
}
else
{
$_SESSION["brute_count"] = $_SESSION["brute_count"] + 1;
$try_date = gmdate("Y-m-d");
//check limit
$check_query = "SELECT attempts FROM ".IPBLOCKER_TABLE." WHERE ip_addr = %s AND try_date = %s";
$attempt_count = $wpdb->get_var($wpdb->prepare($check_query, $_SERVER['REMOTE_ADDR'], $try_date ));
if($attempt_count >= LOGIN_FAILURES)
{
unset($_SESSION["brute_count"]);
$update_query = "UPDATE ".IPBLOCKER_TABLE." SET is_blocked = 1 WHERE ip_addr = %s AND try_date = %s";
$wpdb->query($wpdb->prepare($update_query, $_SERVER['REMOTE_ADDR'], $try_date ));
wp_redirect(site_url('/wp-admin/'));
exit;
}
else{
$query = "UPDATE ".IPBLOCKER_TABLE." SET attempts = %d WHERE ip_addr = %s AND try_date = %s";
$wpdb->query( $wpdb->prepare(
$query,
$_SESSION["brute_count"],
$_SERVER['REMOTE_ADDR'],
$try_date
) );
}
}
}
add_action("wp_login_failed", "simple_ip_blocker_reset_bruteforce");
?>
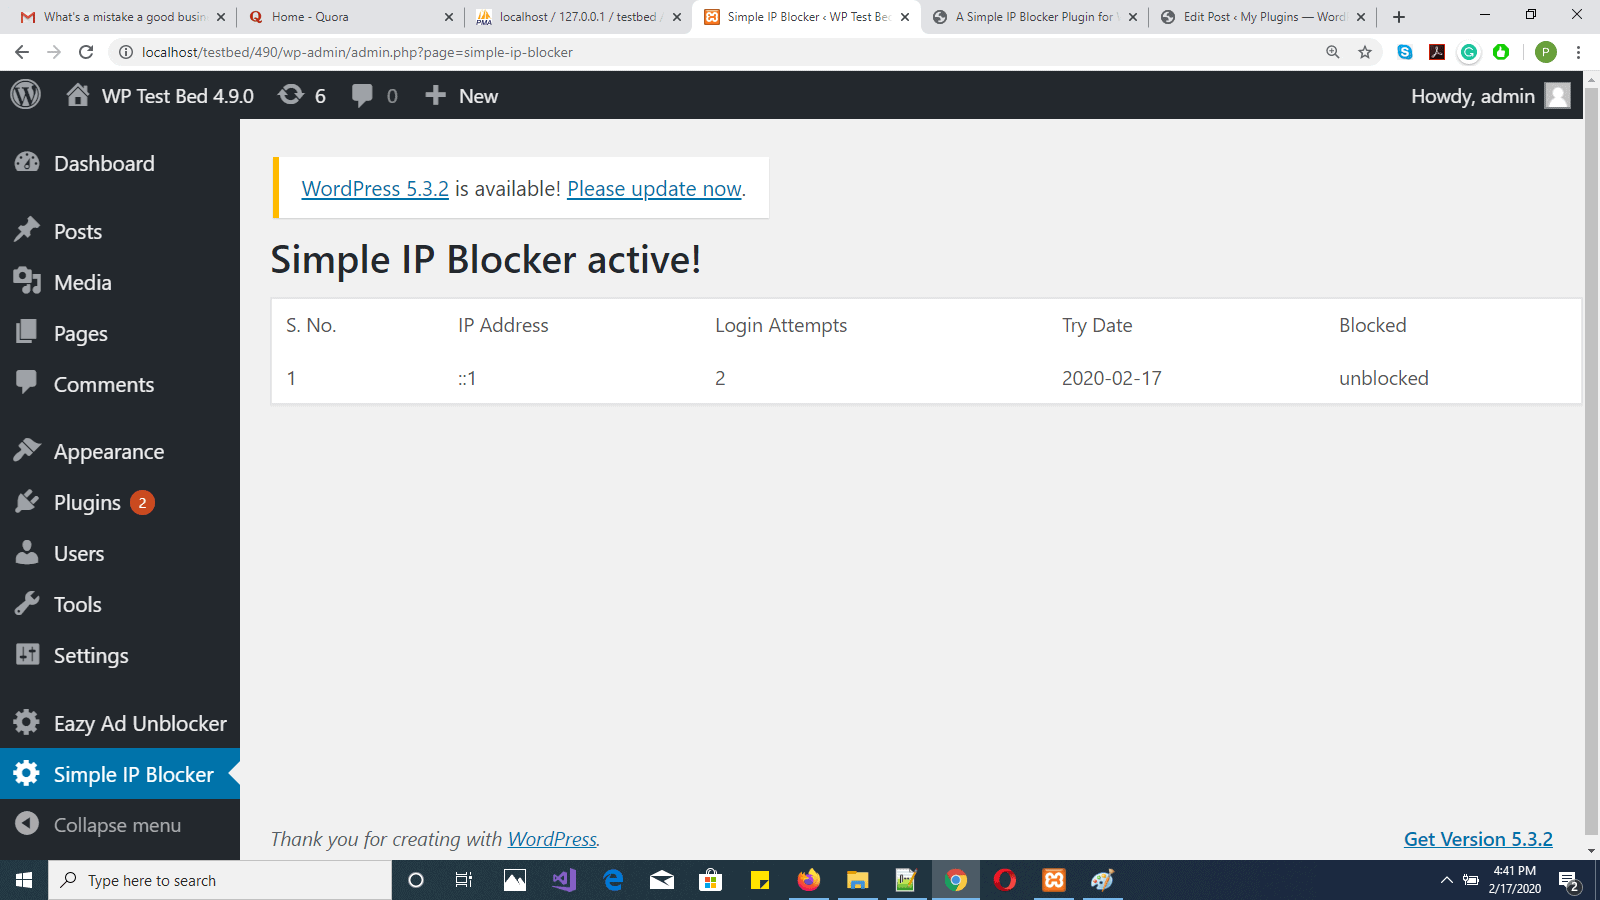
7. So far so good. Now we will create a function to display the data of
failed logins in the wordpress backend. We will call this function
“simple_ipblocker_menu_callback”. It will simply query the database table
that we created and list out the information in tabular form.
See the code below:
<?php
function simple_ipblocker_menu_callback() {
global $wpdb;
$get_history = "SELECT * FROM ".IPBLOCKER_TABLE; //" LIMIT $offset, 10;
$history = $wpdb->get_results($get_history, ARRAY_A); ?>
<h1>Simple IP Blocker active!</h1>
<table border="0" cellspacing="5" cellpadding="5" class="widefat" >
<tr>
<td>S. No.</td>
<td>IP Address</td>
<td>Login Attempts</td>
<td>Try Date</td>
<td>Blocked</td>
</tr>
<?php foreach($history as $row){ ?>
<tr>
<td><?php echo $row["id"]; ?></td>
<td><?php echo $row["ip_addr"]; ?></td>
<td><?php echo $row["attempts"]; ?></td>
<td><?php echo $row["try_date"]; ?></td>
<td><?php echo ($row["is_blocked"] == 1)?"blocked":"unblocked"; ?></td>
</tr>
<?php } ?>
</table>
<?php } ?>
8. In this step, we will simply write some code to call the function created above whenever the user
clicks the link for the plugin in the admin sidebar on the left. See below:
<?php

function simple_ipblocker_menu_add() {

     add_menu_page("Simple IP Blocker", "Simple IP Blocker", "administrator", "simple-ip-blocker", "simple_ipblocker_menu_callback" );

}

add_action("admin_menu", "simple_ipblocker_menu_add");

?>
9. The last function to be created is the function that checks if the user’s IP is blocked. If so,
the user will not be able to login to the admin dashboard on that day. However, the user may try
logging in on the next day again.
We will call this function “simple_ip_blocker_check_ip”. In this function, we will check if the user’s
IP address is marked 1 in the is_blocked field. If so, the user will be prevented from logging in.
The function hooks into “wp_authenticate” and hence will fire before every login attempt.
The code is as follows:
<?php
function simple_ip_blocker_check_ip() {
global $wpdb;
$try_date = gmdate("Y-m-d");
$check_IP = "SELECT is_blocked FROM ".IPBLOCKER_TABLE." WHERE ip_addr = %s AND try_date = %s";
$blocked = $wpdb->get_var( $wpdb->prepare(
$check_IP,
$_SERVER['REMOTE_ADDR'],
$try_date
) );
if($blocked == 1)
{
wp_die("IP address blocked!");
}
}
add_action("wp_authenticate", "simple_ip_blocker_check_ip");
?>
10. Lastly, now that the coding is complete, we need to activate the “Simple IP Blocker” plugin listed in the
wp-admin and test it according to the functionality in the steps above.
The full listing is as follows:
<?php
/*
* Plugin Name: My Simple IP Blocker
*/
global $wpdb;

define("LOGIN_FAILURES", 3);
define("IPBLOCKER_TABLE", $wpdb->prefix.'ip_blocker');

function simple_ip_blocker_create_table()
{
  global $wpdb, $table_prefix;

  $create_tab_query = "CREATE TABLE IF NOT EXISTS `".IPBLOCKER_TABLE."`(
    `id` bigint(20) NOT NULL AUTO_INCREMENT,
    `ip_addr` varchar(20) NOT NULL,
    `attempts` int(4) NOT NULL,
    `try_date` date NOT NULL,
    `is_blocked` tinyint(1) NOT NULL,
    PRIMARY KEY (`id`)
  ) ENGINE=MyISAM  DEFAULT CHARSET=utf8";

  $wpdb->query($create_tab_query);
}

register_activation_hook( __FILE__, 'simple_ip_blocker_create_table' );


function simple_ip_blocker_reset_bruteforce()
{
   @session_start();

   global $wpdb, $table_prefix;

   if(!isset($_SESSION["brute_count"]))
   {
    $_SESSION["brute_count"] = 1;

    $query = "INSERT INTO ".IPBLOCKER_TABLE."(ip_addr, attempts, try_date, is_blocked) VALUES(%s, %d, %s, %d)";

    $try_date = gmdate("Y-m-d");

    $wpdb->query( $wpdb->prepare(
      $query,
      $_SERVER["REMOTE_ADDR"],
      $_SESSION["brute_count"],
      $try_date,
      0
    ) );

   }
   else
   {
    $_SESSION["brute_count"] = $_SESSION["brute_count"] + 1;

    $try_date = gmdate("Y-m-d");

     //check limit

    $check_query = "SELECT attempts FROM ".IPBLOCKER_TABLE." WHERE ip_addr = %s AND try_date = %s";

    $attempt_count = $wpdb->get_var($wpdb->prepare($check_query, $_SERVER['REMOTE_ADDR'], $try_date ));

     if($attempt_count >= LOGIN_FAILURES)
     {
       unset($_SESSION["brute_count"]);

       $update_query = "UPDATE ".IPBLOCKER_TABLE." SET is_blocked = 1 WHERE ip_addr = %s AND try_date = %s";

       $wpdb->query($wpdb->prepare($update_query, $_SERVER['REMOTE_ADDR'], $try_date ));

       wp_redirect(site_url('/wp-admin/'));

       exit;

     }
     else{

      $query = "UPDATE ".IPBLOCKER_TABLE." SET attempts = %d WHERE ip_addr = %s AND try_date = %s";

      $wpdb->query( $wpdb->prepare(
        $query,
        $_SESSION["brute_count"],
        $_SERVER['REMOTE_ADDR'],
        $try_date
       ) );


     }
   }
}

add_action("wp_login_failed", "simple_ip_blocker_reset_bruteforce");  //plugin admin panel


//pre-authentication

function simple_ip_blocker_check_ip()
{
  //die('done');
  global $wpdb;

  $try_date = gmdate("Y-m-d");

  $check_IP = "SELECT is_blocked FROM ".IPBLOCKER_TABLE." WHERE ip_addr = %s AND try_date = %s";

  $blocked = $wpdb->get_var( $wpdb->prepare(
        $check_IP,
        $_SERVER['REMOTE_ADDR'],
        $try_date
       ) );

  if($blocked == 1)
  {
    wp_die("IP address blocked!");
  }
}

add_action("wp_authenticate", "simple_ip_blocker_check_ip");

function simple_ipblocker_menu_callback()
{

  global $wpdb;

  /* $page = (isset($_GET['pg']))?$_GET['pg']:1;

  $offset = ($page - 1) * 10; */

  $get_history = "SELECT * FROM ".IPBLOCKER_TABLE; //" LIMIT $offset, 10";

  $history = $wpdb->get_results($get_history, ARRAY_A);

  ?>
  <h1>Simple IP Blocker active!</h1>
    <table border="0" cellspacing="5" cellpadding="5" class="widefat">
      <tr>
        <td>S. No.</td>
        <td>IP Address</td>
        <td>Login Attempts</td>
        <td>Try Date</td>
        <td>Blocked</td>
      </tr>
      <?php
        foreach($history as $row)
        {
          ?>
          <tr>
            <td><?php echo $row["id"]; ?></td>
            <td><?php echo $row["ip_addr"]; ?></td>
            <td><?php echo $row["attempts"]; ?></td>
            <td><?php echo $row["try_date"]; ?></td>
            <td><?php echo ($row["is_blocked"] == 1)?"blocked":"unblocked"; ?></td>
          </tr>
          <?php
        }
      ?>
    </table>
  <?php


}

function simple_ipblocker_menu_add()
{
  add_menu_page("Simple IP Blocker", "Simple IP Blocker", "administrator", "simple-ip-blocker", "simple_ipblocker_menu_callback" );
}

add_action("admin_menu", "simple_ipblocker_menu_add");
//plugin admin panel end

?>