Adding Voice to Captcha to Secure Web Forms

Hi Guys!

In my last post here, I discussed the creation of a captcha code to secure web forms using the HTML 5 Canvas tag along with JavaScript and PHP as the server side language. I loaded a custom web font using the JavaScript Font Face API to draw a random text string on the canvas with it. The random Captcha text was also refreshable in case the site visitor did not find it legible enough.

I assume that the reader knows PHP Web Forms and Sessions, CSS, HTML5 Canvas JavaScript API, JavaScript for browsers including FontFace API, Audio API and AJAX. You may read the appropriate tutorials from the web if you don’t.

So, what’s new in this post? I have used a text to speech API to let users hear audio captcha, in case the captcha is not very legible or the user has a vision problem.

How to create a random string

The following code creates a random text and initializes it into the PHP session.

<?php @session_start(); $_SESSION["captcha_hash_voice"] = substr(hash('joaat', microtime()), 0, 6); ?>

As you can see, a timestamp is created with a call to the microtime() function. It is then hashed with the JOAAT algorithm. We then extract the first six characters of this hash as our captcha string.

Creating The Web Form

We will create the HTML form or web form using HTML and CSS for coding and styling. Here it is:

<!DOCTYPE html>
<html>
<head>
  <meta name="viewport" content="width=device-width, initial-scale=1.0">
  <style type="text/css">
  #captcha_img{ display:none; }
  #captcha_code{ width: 180px; }
  #captcha{ border: solid 1px black; float:left; }
  #refresh_img{ cursor:pointer; }
  #play_audio{ cursor:pointer; }
  </style>
  <script src="https://code.jquery.com/jquery-3.6.4.min.js" integrity="sha256-oP6HI9z1XaZNBrJURtCoUT5SUnxFr8s3BzRl+cbzUq8=" crossorigin="anonymous"></script>
</head>
<body>
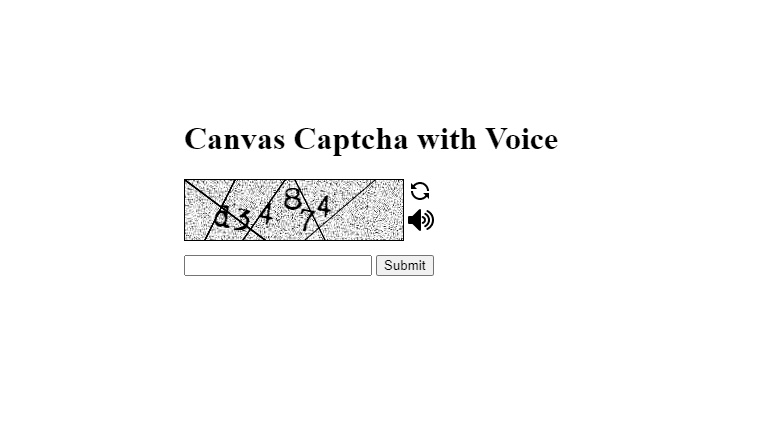
  <h1>Canvas Captcha with Voice</h1>
  <?php if(isset($_SESSION["form_msg"])){ echo $_SESSION["form_msg"]; unset($_SESSION["form_msg"]); } ?>
  <img src="images/captcha.jpg" alt="captcha image" id="captcha_img" />
  <form action="" method="POST">
  <canvas id="captcha" width="218" height="60" ></canvas>
  <span >&nbsp;<img src="images/refresh.png" alt="refresh image" id="refresh_img" title="Refresh" /><br/>
  &nbsp;<img src="images/audio.png" alt="play_audio" id="play_audio" title="Play audio" /></span>
  <br /><br />
  <input type="text" name="captcha_code" value="" id="captcha_code" maxlength="6" />
  <input type="submit" name="submit" value="Submit" />
  </form>
  <script src="script/js/script.js"></script>
</body>
</html>

As you can see, we declare an HTML 5 document with the DOCTYPE declaration. We fetch the latest jQuery file from https://code.jquery.com/ in the script tag in the head of the HTML 5 document we just created.

We have created an invisible image fetching the image from the path “images/captcha.jpg” relative to our document or web page. We have also used some CSS to style the text input of our web form.

Notice the call to fetch “script/js/script.js”. We will discuss this later.

The Script to which Our Form is Submitted

You will notice the script above the <form> tag. In this script, we will simply compare the value of the “captcha_code” form field (i.e. $_POST[“captcha_code”]) and the random string stored in the PHP session (i.e. $_SESSION[“captcha_hash_voice”]) when the form is submitted by the user.

The code is given below:

<?php 
@session_start();

if(isset($_POST["submit"]) && $_POST["submit"] == "Submit")
{
  
  if($_POST["captcha_code"] != $_SESSION["captcha_hash_voice"])
  {
    //failed
    $_SESSION["form_msg"] = "<span style='color:red;'>Security challenge failed!</span>";
    
    header("Location: index.php");
    exit;
  }
  else{
    //passed
    $_SESSION["form_msg"] = "<span style='color:green;'>Security challenge passed!</span>";
    
    header("Location: index.php");
    exit;
  }
}
else{
  $_SESSION["captcha_hash_voice"] = substr(hash('joaat', microtime()), 0, 6);
}

?>


The Script That Renders the Captcha String on the Canvas

Perhaps you noticed the call to fetch “script/js/script.js”. Why do we need to do this?

This is needed because we have to reference the PHP session variable $_SESSION[“captcha_hash_voice”], so that we can render it on the HTML 5 canvas using JavaScript.

When the web page loads for the first time, the following code renders the captcha:

var canvasObj = document.getElementById('captcha');
// we need this to load the font
var myFont = new FontFace('myFont', 'url(font/Moms_typewriter.ttf)');

myFont.load().then(function(font){

  // with canvas, if this is ommited won't work
    document.fonts.add(font);

    console.log('Font loaded');

  console.log(canvasObj);
  
  var captchaImage = document.getElementById("captcha_img");

  var context = canvasObj.getContext("2d");
  
  context.drawImage(captchaImage,0,0);
    
  context.font='28px myFont';
  
  var capText = '';
  
  jQuery.get("script/getcaptchastring.php", {'action':'fetch'}, function(response){
    
    capText = response;
    
    var capArray = capText.split('');
  
    drawLines(context);
    
    rotateText(context, capArray);
    
    
  });
  
});

As you can see, there are two JavaScript functions named “drawLines” and “rotateText”, which need elaboration.

The “drawLines” function draws zigzag lines in the captcha image background by obtaining a 2D graphics context of the canvas object using the line of JavaScript as follows:

var context = canvasObj.getContext("2d");

This complete JavaScript function is as follows:

function drawLines(context)
{
  //random lines
  context.moveTo(0,0);
  context.lineTo(80, 60);
  context.stroke();
    
  context.moveTo(50,0);
  context.lineTo(20, 60);
  context.stroke();
    
  context.moveTo(58, 60);
  context.lineTo(100, 0);
  context.stroke();
    
  context.moveTo(110, 0);
  context.lineTo(140, 60);
  context.stroke();
    
  context.moveTo(120, 60);
  context.lineTo(190, 0);
  context.stroke();
}

The “rotateText” function renders the six characters of the split string, which was previously set in PHP session. It rotates the canvas 2D graphical context this way and that, sumultaneously rendering the individual characters of the captcha in the custom font. After finishing its job, the context is restored to its initial orientation.

function rotateText(context, capArray)
{
  //rotated captcha
  
  context.rotate(10 * Math.PI / 180);
  context.fillText(capArray[0], 35, 40);
  
  context.rotate(5 * Math.PI / 180);
  context.fillText(capArray[1], 59, 35);
  
  context.rotate(-5 * Math.PI / 180);
  context.fillText(capArray[2], 79, 30);
  
  context.rotate(-10 * Math.PI / 180);
  context.fillText(capArray[3], 99, 30);
  
  context.rotate(10 * Math.PI / 180);
  context.fillText(capArray[4], 119, 30);
  
  context.rotate(-5 * Math.PI / 180);
  context.fillText(capArray[5], 134, 25);
  
  context.rotate(-5 * Math.PI / 180);
  context.restore();
}

Creating a Refreshable Captcha

In the code listing that creates our web form, notice the following line:

<img src="images/refresh.png" alt="refresh image" id="refresh_img" />

We will add a click handler to it so that captcha can be refreshed on click. We will use AJAX so as to get the PHP session variable from the server side, modify it and render it without reloading the entire page. Refreshing will change the session variable and hence the captcha string, but the logic to render the changed string remains the same.

Note that on each refresh, we need to clear the Canvas of the zigzag lines and the wavy text, so that there is no overwriting and spoiling the appearance of the captcha.

Here is the code:

//Client side code

jQuery(document).ready(function()
{	
  var canvasObj = document.getElementById('captcha');
  
  var captchaImage = document.getElementById("captcha_img");
  
  var context = canvasObj.getContext("2d");
  
  jQuery("#refresh_img").click(function(){
    jQuery.get("script/getcaptchastring.php", {'action':'refresh'}, function(response){
      
      var capArray = response.split('');
      
      context.clearRect(0, 0, canvasObj.width, canvasObj.height);
      
      context.drawImage(captchaImage,0,0);
      
      context.font='28px myFont';
      
      drawLines(context);
      
      rotateText(context, capArray);	
      
    });
  });
});

There is an AJAX call to “script/getcaptchastring.php” which modifies the captcha string. The following is the code listing for getcaptchastring.php:

<?php 
  //server side code

  @session_start();

  if(isset($_GET['action']))
  {
    if($_GET['action'] == 'fetch') //render captcha first time
    {
      echo $_SESSION["captcha_hash_voice"];

      exit();
    }
    elseif($_GET['action'] == 'refresh') //refresh captcha on clicking refresh icon
    {
      $captcha_hash_new = substr(hash('joaat', microtime()), 0, 6);

      $_SESSION["captcha_hash_voice"] = $captcha_hash_new;

      echo $_SESSION["captcha_hash_voice"];

      exit();
    }
  }

?>

Add Audio Functionality

Now let us add voice functionality.

We will use Google’s Text To Speech API, to feed the captcha string to it and get the speech version as result.

Let us see the client-side code, which is an addition to script/js/script.js:

//audio
jQuery("#play_audio").click(function(){
  
  var audioClip = new Audio("script/playback.php?d="+(new Date()).getMilliseconds());
  
  audioClip.load(); //load the audio clip
  audioClip.play(); //play the audio clip
  
}); 

As you can see, we are creating an object of Audio in JavaScript. We are passing the script at the path “playback.php” to it. We are using a query string while loading playback.php so as to prevent caching while playing the sound clip with it. So that the audio clip changes as the captcha string or, in other words the $_SESSION token changes, on refreshing or reloading, for instance.

The code of playback.php is below:

<?php 
  @session_start();
  header("Content-Type: audio/mpeg");

  $audio_split = str_split($_SESSION["captcha_hash_voice"]); //read letter by letter

  foreach($audio_split as $k=>$voice)
  {

    $voice = rawurlencode(htmlspecialchars($voice));

    $audio = file_get_contents('https://translate.google.com/translate_tts?ie=UTF-8&client=gtx&q='.$voice.'&tl=en-IN');
    echo $audio;
  }

  exit;
?>

The following line:

header("Content-Type: audio/mpeg");

is used to tell the browser to treat the output of playback.php as a sound or audio clip.

We feed the captcha string character by character to the text to speech API at:

‘https://translate.google.com/translate_tts?ie=UTF8&client=gtx&q=’.$voice.’&tl=en-IN’

When the speaker icon in the web form, given above, is clicked, the characters are read by the API ,one by one, so that the user can hear them distinctly. The user can then type in his answer to the captcha challenge. If the captcha is refreshed and the speaker icon is clicked, the new captcha will be read aloud for the user, letter by letter.

Conclusion

So all in all, we did the following:

  • Initialized the first six characters of the hash of microtime() as a session variable in PHP
  • Created a HTML 5 page with a web form and Canvas tag.
  • Created a PHP script to which the form will be submitted, to check the captcha challenge.
  • Created a script to render the Captcha string on the background image, with zigzag lines, with wavy characters using a custom font.
  • Created Server side and client side logic to modify the session variable, return it to the client side and render it to the captcha background each time refresh image is clicked and the canvas is cleared.
  • Created functionality to read aloud the captcha rendered on the screen, on clicking the speaker icon on the web form, before or after clicking the refresh icon.

The code can be downloaded here, and the demo can be found here.

I hope you find it useful, with the addition of voice functionality, since we often need to secure web forms with some kind of captcha and some users may have trouble reading the captcha.

Four Ways To Detect Browser Adblockers Using Javascript

Image credit: getadblock.com

Hi guys!

In this post, I will discuss four ways to detect adblockers in browsers using Javascript with jQuery framework. I shall stick to adblocking browser extensions only. This application of code enables you to notify the user of your site whether an adblocking extension is active in the user’s browser or not. The use cases are based on Google Chrome browser and AdBlock browser extension.

1. Offering a DIV as bait to the adblocker

First we create a wrapper DIV. Inside this div we create another DIV having no content and add some CSS classes to the inner DIV such as “adBanner”, “adsBanner”, etc.

We then browse to our webpage with the DIVS in it and with “AdBlock” adblocker extension installed and active in the browser. On opening the Developer tools in the browser, we will see that the inner DIV with the aforementioned CSS classes does not show at all. What happened? The adblocker blocked the element! Now, how do we detect this programmatically?

Simple. We detect the height of the inner DIV with the CSS classes on it. It will be returned as ‘0’ (zero). This can be done with only Javascript or even with jQuery. What action do we take on getting the inner DIV height as 0? We can notify the site visitor that their adblocker is on with say, a popup. We can also ask them politely to switch it off if we have painstakingly monetized our site with adverts, since all those adverts are blocked now.

When the visitor to our site switches off their adblocker and refreshes the page, the inner DIV will not be blocked. (Hopefully!) So then we can choose not to show the popup again.

First, include jQuery file in your test webpage. Now, let’s have a look at code:

The following code goes into the <body> tag of your webpage:

<style>
.adsBanner{
  background-color: transparent;
  height: 1px;
  width: 1px;
  }
</style>
<script>
jQuery(function(){
  if(jQuery('.wrapper').height() == 0)
  {
    alert("Ad Blocker is active");
  }
  else
  {
    alert("Ad Blocker is NOT active");
  }
});
</script>
<h2>Detect addons AdBlock Div Demo</h2>
<div class="wrapper">
  <div class="adBanner adsBanner"></div>
</div>

You will see an alert with a message saying “Ad Blocker is active” in your Chrome browser on browsing to your web page with AdBlock extension active.

Reference: https://html-online.com/articles/detect-adblock-javascript/

2. Offering a dummy ad script to the ad blocker

We create a javascript file called ads.js and keep in the same folder as our test web page. We then create a boolean variable that will be true. Immmediately after this line of code, we make a call to our dummy ad script ads.js. In the dummy script, we set this variable to false. So, when the ad blocker is active, the variable is true. If not, the variable is false.

This simple technique works for many ad blockers but not for some of them such as Privacy Badger. So, when the boolean variable is true, we can choose to show the notification and not show it when the variable is false.

Let’s have a look at the code:

First, the dummy ad script, ads.js:

//simple ad script
usingAdBlocker = false;

Then, the test web page.  The following code goes in your <body> tag of your page. Be sure to include the jQuery file in your <head> tag of the page.

<script>var usingAdBlocker = true;</script>
<script src="ads.js"></script><!-- dummy ad script-->
<script>
if(usingAdBlocker == true)
{
  alert("Ad Blocker active");
}
else
{
  alert("Ad Blocker NOT active");
}
</script>
<h2>Detect addons AdBlock JS Demo</h2>

If your AdBlock extension is active, you will see an alert with the message “Ad Blocker active”

Reference: https://www.labnol.org/code/19818-detect-adblock-javascript

3. Sideloading a web accessible resource of an adblocking browser extension

The more advanced and more popular adblocker extensions do not follow the element blocking technique. They follow a more advanced method of blocking adverts. To deal with this, we side load a web asccessible resource that is part and parcel of the extension itself. How do we find such a resource?

For this example, I will use the Google Chrome browser and the “AdBlock” extension.

You can find the id of the extension by going to your extension manager in Chrome and clicking on the “Details” link corresponding to your adblocker. Here “gighmmpiobklfepjocnamgkkbiglidom” refers to the extension “id” that is assigned to it.

Browse to the following URL in Chrome:

chrome-extension://gighmmpiobklfepjocnamgkkbiglidom/manifest.json

You will see a large JSON object with one key in the array that is “web_accessible_resources”. Choose any one of the URIs under this key. We will use the “adblock-onpage-icon.svg” URI for our example.

Browse the following URL:

chrome-extension://gighmmpiobklfepjocnamgkkbiglidom/adblock-onpage-icon.svg

Verify that this URL loads properly.

What will we have to do to use this URL? We will simply load it in a browser request, ajax or fetch, via Javascript/ jQuery and wait to receive the HTTP response. If we get a HTTP response code of 200, we can be sure that the plugin or extension is active, since it is possible to load it. We can then perform functions identical to point number 1 and 2 as above.

The following code goes in your <body> tag of your page. Be sure to include the jQuery file in your <head> tag of the page.

<h2>Detect addons AdBlock Side Load Demo</h2>
<script>
console.log(navigator);
//JSON Object for extension details 
var ExtensionObj = 
    {
      "extensionName": "AdBlock",
      "extensionID": "gighmmpiobklfepjocnamgkkbiglidom",
      "resourceURL": "/adblock-onpage-icon.svg", //icon128.png
      "fileType": "image",
      "protocolPrefix": "chrome-extension://",
      "browser": "Chrome"
    };
    
//fetch extension resource	
function UrlExistsExt(protocolPrefix, extId, resourceURL, fileType, cb)
{
  
  var url = protocolPrefix+extId+resourceURL;
  
  $.ajax({
    url: url,
    dataType: fileType,
    type: 'GET',
    complete: function(xhr){
      
      console.log(xhr.status);
      
      if (typeof cb == 'function')
        cb.apply(this, [xhr.status]);
    }
  })
        
}
    
//Ghostery
var ShowPopupExt = false;

//mai function
function UnblockerExtFunc(ExtensionObj)
{
  var currExt = ExtensionObj;
  
  if(navigator.userAgent.indexOf(currExt.browser) != -1)
  {
  
    console.log("Browser matched.");
  
    UrlExistsExt(currExt.protocolPrefix, currExt.extensionID, currExt.resourceURL, currExt.fileType, function(status){
        
      if(status == 200)
      {
        ShowPopupExt = true;
        alert('Extension Detected'); //show dialog here
        
      }
      else{
         alert('Extension Not Found');
      }                                
    });
  }
}

UnblockerExtFunc(ExtensionObj);

$(document).ajaxStop(function(){
        
  if(ShowPopupExt)
  {
    alert("Show Popup"); //if dialog is to be displayed
  }

});
</script>

If your AdBlock extension is active, you will see an alert with the message “Extension Detected” and another with the message “Show Popup”.

Reference: https://developer.chrome.com/docs/extensions/mv3/manifest/web_accessible_resources/

4. Using the default adblocker behavior towards standard ad script URLs

There is a third class of adblockers that use even more advanced techniques of blocking ads. And, they provide no web accessible resources to latch on to. So what do we do? We utilize the default adblocking behavior of these extensions towards standard URLs of adblocking scripts.

The logic is as follows: We try to load a standard adblocker script URL using javascript or jQuery. If an adblocker is active, a request to such a script URL will be blocked. If it is not active, it will yield an HTTP response code of 200 or “OK”.

So if we get a HTTP status code of 200 from a request to any standard javacript ad script URL, we can be certain that an adblocker is not active and is not blocking the request.

We can then perform functions identical to point number 1, 2 and 3 as above.

The following code goes in your <body> tag of your page. Be sure to include the jQuery file in your <head> tag of the page.

<h2>Detect addons New URLs</h2>
<script> 

var FlaggedURL = 'https://pagead2.googlesyndication.com/pagead/js/adsbygoogle.js'; //standard ad script

jQuery(function($){
  function callMe(FlaggedURL)
  {
    $.ajax({
    url: FlaggedURL,
    type: 'GET',
    complete: function(xhr){
      
        console.log(xhr.status); //200 for OK
        
        if(xhr.status === 200)
        {
          alert("NO adblocker active");
          
        }
        else if(xhr.status === 0)
        {
          alert("Adblocker active");
        }
      }
    });
  }
  
  console.log('ready');
  
  callMe(FlaggedURL);
});
</script>

You will see an alert with a message saying “Adblocker active” in your Chrome browser on browsing to your web page with AdBlock extension active.

Reference: https://stackoverflow.com/questions/33812704/run-an-ajax-request-on-a-url-blocked-for-detecting-adblocker-ghostery

Conclusion

So, in this article, I have given four ways of detecting adblockers in browsers using javascript/jQuery. You can easily apply these code snippets to make plugins, scripts, etc.

Did you like the article? Let me know in the comments below!


Sample Code Generating String Combinations of Characters

In my post here, I shared an algorithm to generate all possible combinations of a given set of characters for a specified range of lengths. In this post, I shall share a code sample written in Java that implements the algorithm shared before. It does not use any goto keyword and hence does not create sphagetti code.

The code uses the concurrency API of Java and is fully parallelized. It maxes out the CPU cores of a multi-core CPU and achieves a few million iterations per second. The code sample uses a custom utility function ‘power’ for calculating powers of integers. It is made static for more execution speed.
The code is commented in places to help readers understand it.

As with the algorithm, I take no responsibility for what is done with this code.

package stringgenerator;

import java.util.concurrent.*;
import java.util.concurrent.atomic.*;

public class StringGenerator implements Runnable
{
  private static char[] dict = {'a', 'b', 'c', 'd', 'e', 'f', 'g', 'h', 'i', 'j', 'k', 'l'};  //allowed characters
  
  private static ExecutorService ex;
  
  private static AtomicLong attempts = new AtomicLong(0); //count the number of combinations generated
  
  private static Object locker = new Object();
  
  private static long maxAttempts = 0; //total possible combinations of characters of specified lengths
  
  private static int maxLen = 0;
  
  private static long getMaxAttempts(int radix, int maxLen)
  {
    maxAttempts = (power(radix, maxLen) - 1)*radix /(radix-1);
    
    return maxAttempts;
  }
  
  //utility function to calculate powers of integers
  private static long power(int base, int exp)
  {
    if(exp < 0)
    {
      return 1/power(base, -exp);
    }
    else if(exp == 0)
    {
      return 1;
    }
    else{
      long pow = 1;
      for(int p = 1; p <= exp; p++)
      {
        pow*=base;
      }
      
      return pow;
    }
  }
  
  //the main work horse of this program, breaking all possible numbers into combinations
  private static void resolveRadix(int len, long num)
  {
    long[] retVal = new long[len];
    
    int pow = 0;
    int i = -1;

    int radix = len;
    
    for(i = 0; power(radix ,i ) <= num; i++ );
    
    for(int j = 0; j < len - i; j++)
    {
      retVal[j] = 0;
    }
    
    for(int k = len - i; k < len; k++)
    {
      long t = power(radix, i - 1);
      if(i > 1)
      {
      
        retVal[k] = (long)((num - (num % t)) / t);
      
      }
      else
      {
        retVal[k] = (num % radix);
      }
      num -= (retVal[k] * t);
      
      i--;
    }
    
    char[] combo = new char[len];
    
    for(int j = 0; j < len; j++)
    {
      combo[j] = dict[(int)retVal[j]];
    }
    
    String str = new String(combo);
    
    final long attemptsVal = attempts.incrementAndGet();
    
    attempts.set(attemptsVal);
  }
  
  private void generate()
  {
    for(int length = 1; length <= maxLen; length++)
    {
      int radix = dict.length;
      
      long max = (long)power(radix, length);

      for(int i=0;i<max;i++)
      {
        resolveRadix(radix, i);
      }
    }
    
  }
  
  public void run()
  {
    generate();
    
    synchronized(locker)
    {
      locker.notify();
    }
      
    ex.shutdownNow();
    
  }
  
  public static void main(String[] args)
  {
    
    ex = Executors.newSingleThreadExecutor();
    
    maxLen = 6;
    
    long atts = getMaxAttempts(dict.length, maxLen);
    
    StringGenerator threads = new StringGenerator();
    
    long start = System.currentTimeMillis();  //execution start time
    
    ex.execute(threads); //execute code parallelly
    
    try{
        
      synchronized(locker)
      {
        locker.wait();
      }
    }
    catch(InterruptedException ie)
    {
      ie.printStackTrace();
    }
    
    long attemptsVal = attempts.get(); //final total number of attempts
    
    long end = System.currentTimeMillis(); //execution end time
    
    double speed = (double)((1000 * attemptsVal)/(end - start)); //rate of generating combos
    
    double seconds = (double)(end - start) / 1000;
    
    System.out.println("per sec = "+speed);
    
    System.out.println("sec = "+seconds);
    
    System.out.println("words = "+attemptsVal);
    
    System.out.println("max words = "+atts);
    
  }
}

Execution after compilation is shown below:

A Simple IP Blocker Plugin for WordPress

In my post here, I had shown how to create a basic “Hello World” plugin that greets the user with a simple “hello world” message in the admin dashboard. Now, let me show you how to create a wordpress plugin that actually does something more useful. In this post, I shall discuss a plugin that restricts the number of login attempts a user can make to login to the admin dashboard of your wordpress site. It makes sense to do this to secure your dashboard from being broken into because an unauthorized user can do just about anything to your site if he manages to access your admin dashboard. This includes defacing your site, deleting your content and God knows what else!

We will call our plugin “Simple IP Blocker”. It will restrict the number of failed login attempts to a fixed number, say three. On the fourth attempt, the user will see an error message “IP address blocked”. The user will be blocked for the remainder of the day on which he made the three unsuccessful login attempts. He will be able to try again on the following day.

Now, let’s get down to the nuts and bolts of the actual plugin. The steps are:

  1. Create a folder for the plugin
  2. Create a PHP file for the code called index.php in that folder.
  3. Create a header for the plugin.
  4. Initialize the required constants.
  5. Create a database table through the activation hook.
  6. Create a function that hooks into wp_login_failed action.
    It logs the failed attempts in the database table and blocks the IP address of the user.
  7. Create a function that displays the logged data from the table.
  8. Hook the function in 7 into the admin_menu action so that the logged data can be displayed.
  9. Create a function that hooks into the login action ‘wp_authenticate’
    that will give an error on trying to login in after ip is blocked.
  10. Activate your plugin and test it.

Let us discuss these steps in detail:

1. Navigate to the wp-content folder in your wordpress installation. Go to the plugins sub folder in it.
Create a folder called “simple-ip-blocker”.

2. Create a blank file titled index.php using your text editor and save it in the folder created in step 1

3. Now, let’s create the header in the index.php file.
Print the following code in after the opening php tag in the index.php file:

<?php 
/ * 
* Plugin Name: My Simple IP Blocker 
*/ 
?>

4. We will initialize the following constants:

<?php 
global $wpdb; 
define("LOGIN_FAILURES", 3); 
define("IPBLOCKER_TABLE", $wpdb-&gt;prefix.'ip_blocker');
?>

5. The above step will create a new line in the plugins section of your wordpress installation and define
the necessary constants.

We need to create a database table to log and count failed login attempts.
We will do this by using the “register_activation_hook” function.
We will create a PHP function named “simple_ip_blocker_create_table”.
In this function, we will write a “CREATE TABLE” MYSQL query. We will execute it by calling $wpdb->query
function on the global $wpdb variable by passing the query in it as a parameter.

We will then pass the “simple_ip_blocker_create_table” function name in the “register_activation_hook” function.

The code is as follows:

<?php 

function simple_ip_blocker_create_table() { 

     global $wpdb, $table_prefix; 
     //mysql query $create_tab_query = 
"CREATE TABLE IF NOT EXISTS `".IPBLOCKER_TABLE."`( 
`id` bigint(20) NOT NULL AUTO_INCREMENT, 
`ip_addr` varchar(20) NOT NULL, `attempts` int(4) NOT NULL, 
`try_date` date NOT NULL, `is_blocked` tinyint(1) NOT NULL, 
PRIMARY KEY (`id`) ) ENGINE=MyISAM DEFAULT CHARSET=utf8"; 

$wpdb->query($create_tab_query); } 

register_activation_hook( __FILE__, 'simple_ip_blocker_create_table' ); ?>


Explanation of table structure:

id – PRIMARY KEY
ip_addr – IP address of user trying to log in.
attempts – number of failed logins per user.
try_date – date on which user s trying to log in.
is_blocked – flag too indicate whether the user is blocked or not.

6. Next, we will create a function that will hook into “wp_login_failed”. We will call
this function simple_ip_blocker_reset_bruteforce. This function will fire whenever the
user tries to login but fails. We will maintain a counter in the $_SESSION. Each failed
login will increment the counter. On reaching 3 attempts, the IP blocked flag, is_blocked
will be marked as 1 to indicate that the particular user is blocked for the remainder of
the day. However, the user can try again on the next day. Each attempt is logged in the
database table we created. For the first failed attempt, a new row will be created in the
table. For subsequent attempts, that row will be updated.For the third failed login,
the “is_blocked” field of that row will be updated to 1.

Check out the code below:

<?php 

function simple_ip_blocker_reset_bruteforce() { 

@session_start(); 
global $wpdb, $table_prefix; 
if(!isset($_SESSION["brute_count"])) { 
$_SESSION["brute_count"] = 1; 
$query = "INSERT INTO ".IPBLOCKER_TABLE."(ip_addr, attempts, try_date, is_blocked) VALUES(%s, %d, %s, %d)"; 
$try_date = gmdate("Y-m-d"); 

$wpdb-&gt;query( $wpdb-&gt;prepare( 
        $query, 
        $_SERVER["REMOTE_ADDR"], 
        $_SESSION["brute_count"], 
        $try_date,
        0
      ) );
      
     }
     else
     {
      $_SESSION["brute_count"] = $_SESSION["brute_count"] + 1;
     
      $try_date = gmdate("Y-m-d"); 
       
       //check limit
        
      $check_query = "SELECT attempts FROM ".IPBLOCKER_TABLE." WHERE ip_addr = %s AND try_date = %s";
        
      $attempt_count = $wpdb-&gt;get_var($wpdb-&gt;prepare($check_query, $_SERVER['REMOTE_ADDR'], $try_date ));
    
       if($attempt_count &gt;= LOGIN_FAILURES)
       {
         unset($_SESSION["brute_count"]);
         
         $update_query = "UPDATE ".IPBLOCKER_TABLE." SET is_blocked = 1 WHERE ip_addr = %s AND try_date = %s";
         
         $wpdb-&gt;query($wpdb-&gt;prepare($update_query, $_SERVER['REMOTE_ADDR'], $try_date ));
         
         wp_redirect(site_url('/wp-admin/'));
         
         exit;
         
       }
       else{
         
        $query = "UPDATE ".IPBLOCKER_TABLE." SET attempts = %d WHERE ip_addr = %s AND try_date = %s";
        
        $wpdb-&gt;query( $wpdb-&gt;prepare( 
          $query,  
          $_SESSION["brute_count"],
          $_SERVER['REMOTE_ADDR'],
          $try_date
         ) ); 
         
         
       }
     } 
  }  

  add_action("wp_login_failed", "simple_ip_blocker_reset_bruteforce");
?>


7. So far so good. Now we will create a function to display the data of
failed logins in the wordpress backend. We will call this function
“simple_ipblocker_menu_callback”. It will simply query the database table
that we created and list out the information in tabular form.

See the code below:

<?php 

function simple_ipblocker_menu_callback() { 

  global $wpdb; 
  $get_history = "SELECT * FROM ".IPBLOCKER_TABLE; //&quot; LIMIT $offset, 10; 
  
  $history = $wpdb->get_results($get_history, ARRAY_A); ?> 
  <h1>Simple IP Blocker active!</h1> 
  <table border="0" cellspacing="5" cellpadding="5" class="widefat" > 
  <tr>
    <td>S. No.</td>
    <td>IP Address</td>
    <td>Login Attempts</td> 
    <td>Try Date</td>
    <td>Blocked</td> 
  </tr> 
  <?php foreach($history as $row){ ?>
    <tr>
      <td><?php echo $row["id"]; ?></td>
      <td><?php echo $row["ip_addr"]; ?></td>
      <td><?php echo $row["attempts"]; ?></td>
      <td><?php echo $row["try_date"]; ?></td> 
      <td><?php echo ($row["is_blocked"] == 1)?"blocked":"unblocked"; ?></td>
    </tr>
  <?php } ?> 
  </table> 
<?php } ?>


8. In this step, we will simply write some code to call the function created above whenever the user
clicks the link for the plugin in the admin sidebar on the left. See below:

<?php 

function simple_ipblocker_menu_add() { 

     add_menu_page("Simple IP Blocker", "Simple IP Blocker", "administrator", "simple-ip-blocker", "simple_ipblocker_menu_callback" ); 

} 

add_action("admin_menu", "simple_ipblocker_menu_add"); 

?>


9. The last function to be created is the function that checks if the user’s IP is blocked. If so,
the user will not be able to login to the admin dashboard on that day. However, the user may try
logging in on the next day again.
We will call this function “simple_ip_blocker_check_ip”. In this function, we will check if the user’s
IP address is marked 1 in the is_blocked field. If so, the user will be prevented from logging in.
The function hooks into “wp_authenticate” and hence will fire before every login attempt.

The code is as follows:

<?php 
       function simple_ip_blocker_check_ip() { 
               global $wpdb; 
               $try_date = gmdate("Y-m-d"); 
               $check_IP = "SELECT is_blocked FROM ".IPBLOCKER_TABLE." WHERE ip_addr = %s AND try_date = %s"; 
               $blocked = $wpdb-&gt;get_var( $wpdb-&gt;prepare( 
          $check_IP,  
          $_SERVER['REMOTE_ADDR'],
          $try_date
         ) );
         
    if($blocked == 1)
    {
      wp_die("IP address blocked!");
    }
  }

  add_action("wp_authenticate", "simple_ip_blocker_check_ip");
?>


10. Lastly, now that the coding is complete, we need to activate the “Simple IP Blocker” plugin listed in the
wp-admin and test it according to the functionality in the steps above.

The full listing is as follows:

<?php  
/*
* Plugin Name: My Simple IP Blocker
*/  
global $wpdb;

define("LOGIN_FAILURES", 3);
define("IPBLOCKER_TABLE", $wpdb->prefix.'ip_blocker');

function simple_ip_blocker_create_table()
{
  global $wpdb, $table_prefix;
  
  $create_tab_query = "CREATE TABLE IF NOT EXISTS `".IPBLOCKER_TABLE."`(
    `id` bigint(20) NOT NULL AUTO_INCREMENT,
    `ip_addr` varchar(20) NOT NULL,
    `attempts` int(4) NOT NULL,
    `try_date` date NOT NULL,
    `is_blocked` tinyint(1) NOT NULL,
    PRIMARY KEY (`id`)
  ) ENGINE=MyISAM  DEFAULT CHARSET=utf8";
  
  $wpdb->query($create_tab_query);
}

register_activation_hook( __FILE__, 'simple_ip_blocker_create_table' );


function simple_ip_blocker_reset_bruteforce()
{ 
   @session_start(); 
   
   global $wpdb, $table_prefix;
   
   if(!isset($_SESSION["brute_count"]))
   {
    $_SESSION["brute_count"] = 1; 
    
    $query = "INSERT INTO ".IPBLOCKER_TABLE."(ip_addr, attempts, try_date, is_blocked) VALUES(%s, %d, %s, %d)";
    
    $try_date = gmdate("Y-m-d");
    
    $wpdb->query( $wpdb->prepare( 
      $query, 
      $_SERVER["REMOTE_ADDR"], 
      $_SESSION["brute_count"], 
      $try_date,
      0
    ) );
    
   }
   else
   {
    $_SESSION["brute_count"] = $_SESSION["brute_count"] + 1;
   
    $try_date = gmdate("Y-m-d"); 
     
     //check limit
      
    $check_query = "SELECT attempts FROM ".IPBLOCKER_TABLE." WHERE ip_addr = %s AND try_date = %s";
      
    $attempt_count = $wpdb->get_var($wpdb->prepare($check_query, $_SERVER['REMOTE_ADDR'], $try_date ));
  
     if($attempt_count >= LOGIN_FAILURES)
     {
       unset($_SESSION["brute_count"]);
       
       $update_query = "UPDATE ".IPBLOCKER_TABLE." SET is_blocked = 1 WHERE ip_addr = %s AND try_date = %s";
       
       $wpdb->query($wpdb->prepare($update_query, $_SERVER['REMOTE_ADDR'], $try_date ));
       
       wp_redirect(site_url('/wp-admin/'));
       
       exit;
       
     }
     else{
       
      $query = "UPDATE ".IPBLOCKER_TABLE." SET attempts = %d WHERE ip_addr = %s AND try_date = %s";
      
      $wpdb->query( $wpdb->prepare( 
        $query,  
        $_SESSION["brute_count"],
        $_SERVER['REMOTE_ADDR'],
        $try_date
       ) ); 
       
       
     }
   } 
}  

add_action("wp_login_failed", "simple_ip_blocker_reset_bruteforce");  //plugin admin panel


//pre-authentication

function simple_ip_blocker_check_ip()
{
  //die('done');
  global $wpdb;
  
  $try_date = gmdate("Y-m-d");
  
  $check_IP = "SELECT is_blocked FROM ".IPBLOCKER_TABLE." WHERE ip_addr = %s AND try_date = %s";
  
  $blocked = $wpdb->get_var( $wpdb->prepare( 
        $check_IP,  
        $_SERVER['REMOTE_ADDR'],
        $try_date
       ) );
       
  if($blocked == 1)
  {
    wp_die("IP address blocked!");
  }
}

add_action("wp_authenticate", "simple_ip_blocker_check_ip");

function simple_ipblocker_menu_callback()
{ 

  global $wpdb;
  
  /* $page = (isset($_GET['pg']))?$_GET['pg']:1;
  
  $offset = ($page - 1) * 10; */
  
  $get_history = "SELECT * FROM ".IPBLOCKER_TABLE; //" LIMIT $offset, 10";
  
  $history = $wpdb->get_results($get_history, ARRAY_A);
  
  ?>
  <h1>Simple IP Blocker active!</h1>
    <table border="0" cellspacing="5" cellpadding="5" class="widefat">
      <tr>
        <td>S. No.</td>
        <td>IP Address</td>
        <td>Login Attempts</td>
        <td>Try Date</td>
        <td>Blocked</td>
      </tr>
      <?php 
        foreach($history as $row)
        {
          ?>
          <tr>
            <td><?php echo $row["id"]; ?></td>
            <td><?php echo $row["ip_addr"]; ?></td>
            <td><?php echo $row["attempts"]; ?></td>
            <td><?php echo $row["try_date"]; ?></td>
            <td><?php echo ($row["is_blocked"] == 1)?"blocked":"unblocked"; ?></td>
          </tr>
          <?php 
        }
      ?>
    </table>
  <?php


}  

function simple_ipblocker_menu_add()
{
  add_menu_page("Simple IP Blocker", "Simple IP Blocker", "administrator", "simple-ip-blocker", "simple_ipblocker_menu_callback" );
}  

add_action("admin_menu", "simple_ipblocker_menu_add");
//plugin admin panel end

?>


Create a Basic WordPress Plugin From Scratch

In my post here, I had shown you how to create a plugin from existing code. In this post, I will show how to create a basic ‘Hello World’ wordpress plugin from scratch.

First of all, create a ‘hello-world’ folder in your plugins subfolder under the wp-content folder of your wordpress installation.
Then, create a blank file in the ‘hello-world’ folder and name it ‘index.php’.
After that, open your index.php file and put the following code in it:

<?php
/*
Plugin Name: Hello World Plugin
Plugin URI: http://myexamplesite.com/hello-world
Description: A simple WordPress Hello World plugin
Version: 1.0
Author: Author Name 
Author URI: http://myownsite.com
License: GPL2
*/
 ?>


This will create a descriptive header in the listing of plugins under the plugins section in wp-admin.

Now create a simple hello_world function in the example index.php page like so:

<?php 

function hello_world()
{
     echo "<h1>Hello World!</h1>"; 
}

?>

But this function needs to be called somewhere to get its output.

To get the output, we need to add the following code to our index.php file.

<?php

function hello_world_callback()
{
      add_menu_page("Hello World", "Hello World", "administrator", "hello-world", "hello_world");
}

add_action("admin_menu", "hello_world_callback");

?>

The add_action function hooks into ‘admin_menu’ to create a link to the plugin in the admin sidebar on the left of your dashboard. On clicking this link, the ‘hello_world’ function is called and the output is displayed on that page.

We will get the output in wp-admin under the “Hello World” tab once we activate the plugin.

So the complete code that needs to be there in the index.php is the following:

<?php
/*
Plugin Name: Hello World Plugin
Plugin URI: http://myexamplesite.com/hello-world
Description: A simple WordPress Hello World plugin
Version: 1.0
Author: Author Name 
Author URI: http://myownsite.com
License: GPL2
*/

function hello_world()
{
     echo "<h1>Hello World!</h1>"; 
} 

function hello_world_callback() { 
     add_menu_page("Hello World", "Hello World", "administrator", "hello-world", "hello_world"); 
} 

add_action("admin_menu", "hello_world_callback");

?>


The video above shows the installation and working of the plugin.

Click the following link for a more detailed tutorial.

GUI Tic-Tac-Toe in Java Revisited

In my post found here I discussed a tic-tac-toe game coded in Java which was a version using a Graphical User Interface. The code listing for the classes and interfaces can be found in the same post. In this post I will discuss a Graphical User Interface (GUI) version of the same application with some additional features. The GUI tic-tac-toe app is based on a console application version found here. I shall only provide the changes and additions to the code listings here. Note that I will use the NetBeans IDE.

We will primarily make changes to the AWTBoard class. After making these changes, the user will be asked whether he really wants to quit when a game is in progress. If he clicks Cancel, the game will continue. If he clicks OK, the game will be terminated. If the game is over or not yet begun, the user will be able to stop the game as usual. See the video below the code listing to understand how it works.

package com.tictactoe.components;

import java.awt.*;
import java.awt.event.*;
import javax.swing.JOptionPane;

/**
 *
 * @author Dell
 */
public class AWTBoard extends Board implements ActionListener{
    
    private Button[][] buttons = new Button[3][3];
    private Frame f;
    private Label l;
    
    private Move currMove;
    private Game myGame;
    
    public AWTBoard()
    {
        super();
        f = new Frame("Tic-Tac-Toe");
        f.setSize(300, 300);
        
        
        Panel topPanel = new Panel();
        
        topPanel.setLayout(new BorderLayout());
        
        Panel p = new Panel();
        
        GridLayout grd = new GridLayout(3,3);
        
        p.setLayout(grd);
        
        for(int i = 0; i &lt; 3; i++)
        {
            for(int j = 0; j &lt; 3; j++)
            {
                buttons[i][j] = new Button();
                
                buttons[i][j].addActionListener(this);
                
                p.add(buttons[i][j], i, j); //problem
                
            }
        }
        
        topPanel.add(p, BorderLayout.CENTER);
        
        l = new Label();
        
        topPanel.add(l, BorderLayout.SOUTH);
        
        f.add(topPanel);

        /****Begin changes****/
        f.addWindowListener(new WindowAdapter(){ 
            
            public void windowClosing(WindowEvent e){ 
                
                if(myGame.isGameOver() || Game.getMovesTillNow() == 0)
                {
                    f.dispose(); 
                    System.exit(0);
                }else{
                    int result = JOptionPane.showConfirmDialog((Component) null, "Game in progress. Are you sure you want to quit?",
        "Message", JOptionPane.OK_CANCEL_OPTION);
            
                    if(result == 0)
                    {
                        f.dispose(); 
                        System.exit(0);
                    }
            
                }
            } 
            
        });
        /****End changes****/        

        //f.pack();
        f.setBounds(200, 200, f.getWidth(), f.getHeight());
        
        f.setVisible(true);
    }
    
    public void setGame(Game game)
    {
        myGame = game;
    }
    
    public void display()
    {
        for(int i = 0; i &lt; 3; i++)
        {
            for(int j = 0; j &lt; 3; j++) 
            {  

                buttons[i][j].setLabel( ""+cells[i][j] );
               
            } 
             
        }  
    }
    
    public void markCell(Move move, char mark)
    {
        if(move.isIsValid())
        {
            int i = move.getRow(); 
            int j = move.getColumn(); 
            cells[i - 1][j - 1] = mark;
            
            buttons[i - 1][j - 1].setLabel(""+mark);
        }
        else
        {
            //System.out.println("INVALID MOVE!\n\n");
            l.setText("INVALID MOVE!");
        }
    }
    
    public Label getStatusLabel()
    {
        return l;
    }
    
    public void actionPerformed(ActionEvent e)
    {
        Button b = (Button)e.getSource();
        
        for(int i = 0 ; i &lt; 3; i++ )
        {
            for(int j = 0; j &lt; 3; j++)
            {
                if(b == buttons[i][j])
                {
                    currMove = new Move();
                    currMove.setRow(i + 1);
                    currMove.setColumn(j + 1);
                    currMove.setIsValid(true);
                }
            }
        }
        
        
        synchronized(this)
        {
            this.notify();
        }
        
    }
    
    public Move getCurrMove()
    {
        return currMove;
    }
}


An elementary security plugin protecting admin dashboard

In this post, I shall discuss an elementary plugin that can protect your wordpress admin dashboard from frequent incorrect login attempts. The plugin redirects the user to the home page after a predetermined number of incorrect logins, three for example. However, if the user enters the correct password after three wrong attempts, the user is logged in to the dashboard. The code hooks into the wp_login_failed action hook and uses a counter variable stored in the session to keep track of the number of login attempts. The plugin backend only tells the administrator that the plugin is active (See image above). The code listing is given below:

<?php 
/* 
* Plugin Name: My Simple Security 
*/ 

function simple_security_reset_bruteforce($username){ 

  @session_start(); 
  if(!isset($_SESSION["brute_count"])) { 
    $_SESSION["brute_count"] = 1; 
  } else { 
    $_SESSION["brute_count"] = $_SESSION["brute_count"] + 1; 
    if($_SESSION["brute_count"] > 3) { 
    
      unset($_SESSION["brute_count"]); 
      wp_redirect(site_url()); 
      exit; 
    } 
  } 
} 

add_action("wp_login_failed", "simple_security_reset_bruteforce"); //plugin admin panel 

function simple_security_menu_callback() { 

  echo "<h1>Simple Security active!</h1>"; 
  
} 

function simple_security_menu_add() { 

  add_menu_page("Simple Security", "Simple Security", "administrator", "simple-security", "simple_security_menu_callback" ); 
  
} 

add_action("admin_menu", "simple_security_menu_add"); //plugin admin panel end 

?>


A recording of the plugin is given below:


To turn this into a plugin and use it in your wordpress:

  1. Create an empty folder in your plugins folder.
  2. Give it an easily understandable name.
  3. Then, create a blank file in any text editor.
  4. Copy the code from the code listing here, including the “<?php” at the start.
  5. Paste the code copied above in your blank file.
  6. Save this file as index.php in your empty folder created above.
  7. Go to the wp-admin and activate the plugin.
  8. Logout from admin and try logging in to wp-admin repeatedly with the wrong password.

It should work as shown in the video above.

Deploying Tic-Tac-Toe Java GUI app

In this post, we deploy our tic-tac-toe Java GUI app so that it can be invoked either by double-clicking it or through the command line. Note: These steps below were performed on a Windows system.

  1. First, assemble all the Java source files in a folder of your choice.
  2. Open your Command Prompt.
  3. Navigate to your chosen folder in the Command Prompt using the cd command. e.g. cd Java\progs\TicTacToeGUIDemo
  4. Compile all the Java source files with javac compiler. e.g. javac -d . *.java.
    * means all Java files in the current folder.
  5. After successful compilation, the root package of your app will appear as a folder. In our case it’s ‘com’.
  6. Now, we need to create a manifest file to help us create a java archive file or JAR file.
    This file can be used to launch the app just by double-clicking on it.
    It can also be invoked using the java command from Command Prompt. e.g. java -jar TicTacToe.jar
  7. Open Notepad and create a blank new file called manifest.mf
  8. In this file, type:Main-Class: com.tictactoe.gameplay.AWTTicTacToe. This is the main class name, qualified by the full package name.
  9. After step 8, be sure to add a blank new line in the text file manifest.mf
  10. Save the manifest file and close it.
  11. Go back to your Command Prompt.
    Type the following: jar cvmf manifest.mf  –jar file name–  –root package folder name–
    e.g. jar cvmf manifest.mf TicTacToe.jar com
  12. You will get some verbose output from the jar command. To open your jar file, you can follow either of the steps in step 6 above.

View the video below to see it all in action.

Coding Tic-Tac-Toe with a Graphical User Interface

In my post found here I discussed a tic-tac-toe game coded in Java which was a console application.
The code listing for the classes and interfaces can be found in the same post. In this post I will discuss a Graphical User Interface (GUI) version of the same application. I shall only provide the changes and additions to the code listings here. Note that I will use the NetBeans IDE.

First I shall discuss the changes to the Board class. Since we shall use inheritance, we shall change the accessibility of the cells from private to protected. This is the only change required. See the listing below.

package com.tictactoe.components;  
/**
 *
 * @author pratyush
 */
public class Board { 
 
    protected static char[][] cells; //change to Board class for inheritance
    
    public Board()
    {
        cells = new char[3][3]; 
        cells[0] = new char[]{' ', ' ', ' '}; 
        cells[1] = new char[]{' ', ' ', ' '}; 
        cells[2] = new char[]{' ', ' ', ' '};
    }
    
    public void display()
    {
        for(int i = 0; i &lt; 3; i++)
        {
            for(int j = 0; j &lt; 3; j++){ 
        if(cells[i][j] == ' ') 
        { 
          System.out.print((i+1)+", "+(j+1)+"\t"); 
        } 
        else{
          System.out.print(cells[i][j]+"\t"); 
        } 
      } 
      
      System.out.print("\n\n"); 
    } 
  } 
  
  public Move checkAvailable(Move move){ 
  
    int i = move.getRow(); 
    int j = move.getColumn(); 
    boolean boundValid = ((i >= 1 && i<= 3) && ( j >= 1 && j <= 3));
    
        boolean charValid = false; 
        if(boundValid)
        {
            charValid = (cells[i - 1][j - 1] == ' ');
        } 
        boolean netValid = (boundValid && charValid); 
        move.setIsValid(netValid); 
        return move;
    }
    
    public void markCell(Move move, char mark)
    {
        if(move.isIsValid())
        {
            int i = move.getRow(); 
            int j = move.getColumn(); 
            cells[i - 1][j - 1] = mark;
        }
        else
        {
            System.out.println("INVALID MOVE!\n\n");
        }
    } 
}


AWTBoard

Among the additions, we shall make a new Board class called AWTBoard which shall inherit all the properties of the Board class. However it shall add the functionalities of GUI from the Java Abstract Windowing Toolkit or AWT packages. The listing of this new class is given below. The AWT version of the Board will be a frame with a 3 X 3 grid of buttons with a status label at the bottom to display all the messages which were being outputted to the console in the console version of the application. The players will play their turns by clicking buttons in the grid.

/*
 * To change this license header, choose License Headers in Project Properties.
 * To change this template file, choose Tools | Templates
 * and open the template in the editor.
 */
package com.tictactoe.components;

import java.awt.*;
import java.awt.event.*;

/**
 *
 * @author Dell
 */
public class AWTBoard extends Board implements ActionListener{
    
    private Button[][] buttons = new Button[3][3];
    private Frame f;
    private Label l;
    
    private Move currMove;
    
    public AWTBoard()
    {
        super();
        f = new Frame("Tic-Tac-Toe");
        f.setSize(300, 300);
        
        
        Panel topPanel = new Panel();
        
        topPanel.setLayout(new BorderLayout());
        
        Panel p = new Panel();
        
        GridLayout grd = new GridLayout(3,3);
        
        p.setLayout(grd);
        
        for(int i = 0; i &lt; 3; i++)
        {
            for(int j = 0; j &lt; 3; j++)
            {
                buttons[i][j] = new Button();
                
                buttons[i][j].addActionListener(this);
                
                p.add(buttons[i][j], i, j);
                
            }
        }
        
        topPanel.add(p, BorderLayout.CENTER);
        
        l = new Label();
        
        topPanel.add(l, BorderLayout.SOUTH);
        
        f.add(topPanel);
        
        f.addWindowListener(new WindowAdapter(){ public void windowClosing(WindowEvent e){ f.dispose(); System.exit(0);} });
        
        
        f.setBounds(200, 200, f.getWidth(), f.getHeight());
        
        f.setVisible(true);
    }
    
    public void display()
    {
        for(int i = 0; i &lt; 3; i++)
        {
            for(int j = 0; j &lt; 3; j++) 
            {  

                buttons[i][j].setLabel( ""+cells[i][j] );
               
            } 
             
        }  
    }
    
    public void markCell(Move move, char mark)
    {
        if(move.isIsValid())
        {
            int i = move.getRow(); 
            int j = move.getColumn(); 
            cells[i - 1][j - 1] = mark;
            
            buttons[i - 1][j - 1].setLabel(""+mark);
        }
        else
        {
            
            l.setText("INVALID MOVE!");
        }
    }
    
    public Label getStatusLabel()
    {
        return l;
    }
    
    public void actionPerformed(ActionEvent e)
    {
        Button b = (Button)e.getSource();
        
        for(int i = 0 ; i &lt; 3; i++ )
        {
            for(int j = 0; j &lt; 3; j++)
            {
                if(b == buttons[i][j])
                {
                    currMove = new Move();
                    currMove.setRow(i + 1);
                    currMove.setColumn(j + 1);
                    currMove.setIsValid(true);
                }
            }
        }
        
        
        synchronized(this)
        {
            this.notify();
        }
        
    }
    
    public Move getCurrMove()
    {
        return currMove;
    }
}


First, let us see the constructor of the new Board class AWTBoard. We create a Frame which is basically a window. We then create a Panel and add it to the content pane of the window created previously. We create a Border Layout for the previously added Panel with a top part and a bottom part. To the bottom part, we add a label to display any status messages needed to be displayed. To the top part of the Panel, we create a Panel with a Grid Layout to add a 3 X 3 Grid of Buttons and then add this panel to the main Panel. The Players play the game by taking turns to click the buttons in this grid.

We override the display method of the Board class to mark the buttons of the grid instead of outputting them to the console. Likewise, we override all those other methods which output to the console. The new method added is the actionPerformed method which is basically an event handler that tells Java what to do when the buttons in the 3 x 3 grid are clicked. getStatusLabel and getCurrMove are helper methods to enable passing data in and out of GUI Board.

AWTTicTacToe

Apart from the GUI Board, we need to introduce another class called AWTTicTacToe which will contain changes to invoke the GUI Board instead of the console.

package com.tictactoe.gameplay;

import com.tictactoe.components.*;

/**
 *
 * @author pratyush
 */
public class AWTTicTacToe {  /**
    * @param args the command line arguments
    */
    public static void main(String[] args) {
        // TODO code application logic here 
        Game game = new Game(); 
        Player player1 = new Player(); 
        player1.setPlayerNum(1); 
        player1.setPlayerMark('X'); 
        player1.setGame(game); 
        Player player2 = new Player(); 
        player2.setPlayerNum(2); 
        player2.setPlayerMark('0'); 
        player2.setGame(game);
        
        //
        AWTBoard board = new AWTBoard();
        board.display();
        
        /*******/ 
        game.setWhoseTurn(player1); 
        game.setGameOver(false); 
        boolean status = game.isGameOver(); 
        // 
        do
        {
            int movesNow = Game.getMovesTillNow(); 
            if(movesNow == 9)
            {
                if(game.getWinner() == null)
                {
                    //
                    board.getStatusLabel().setText("TIE!\n");
                    break;
                }
            } 
            int turn = game.getWhoseTurn(); 
            //
            
            board.getStatusLabel().setText("PLAYER "+turn+" click a button\n"); 
            
            //
            try{
                synchronized(board)
                {
                    board.wait();
                }
            }
            catch(InterruptedException ie)
            {
                ie.printStackTrace();
            }
            
            Move move = board.getCurrMove();
            
            switch(turn)
            {
                case 1:
                    player1.makeMove(board, move); 
                    if(game.checkWinningMoves(player1))
                    {
                        game.setWinner(player1); 
                        //
                        board.getStatusLabel().setText("PLAYER 1 WINS!");
                        game.setGameOver(true);
                    }
                    else
                    {
                        if(move.isIsValid())
                        {
                            movesNow = Game.getMovesTillNow(); 
                            //
                            
                            board.getStatusLabel().setText("MOVE NUMBER "+movesNow+"\n");
                            game.setWhoseTurn(player2);
                        }
                    }
                break;
                case 2:
                    player2.makeMove(board, move); 
                    if(game.checkWinningMoves(player2))
                    {
                        game.setWinner(player2); 
                        //
                        
                        board.getStatusLabel().setText("PLAYER 2 WINS!");
                        game.setGameOver(true);
                    }
                    else
                    {
                        if(move.isIsValid())
                        {
                            movesNow = Game.getMovesTillNow(); 
                            // 
                            board.getStatusLabel().setText("MOVE NUMBER "+movesNow+"\n");
                            game.setWhoseTurn(player1);
                        }
                    }
                break;
                default:
                    //
                    board.getStatusLabel().setText("ERROR!\n");
                break;
            } 
            status = game.isGameOver();
        }
        while(!status); 
    } 
}


AWTTicTacToe is the main class containing the main method. It invokes the AWTBoard class instead of the Board class. It will not contain any statements to output to the console, although it may do so for debugging. To see the results of the invocation of this main class see the video below.


This GUI implementation of tic-tac-toe in Java is not perfect by any means. There is scope for improvement and new features can be added. Meanwhile, you can run this code and enjoy!

Convert Very Large Decimal Integers to Base 62 And Back

The other day I was trying to devise a way of converting arbitrarily large base 10 integers to the order of a billion billion to base 62 and did not get much help from the web. So I devised my own solution using the BC Math extension which ships with PHP by default. So, this solution works upto PHP_INT_MAX which is 9223372036854775807 for 64-bit platform. It also works upto 99 trillion on 32-bit-platform. I used an array as a stack to store successive remainders of division by the base, which is 62, and at the end popped them one by one from the stack to generate the converted base 62 number. The converse, multiplication by successive powers of 62 and addition of those powers helped to convert base 62 back to base 10.

First I used PHP OOPS to create a class called MyBase62Converter. The code is given below:

class MyBase62Converter
{
	private $base62StrVar = '0123456789ABCDEFGHIJKLMNOPQRSTUVWXYZabcdefghijklmnopqrstuvwxyz';
	private $baseInt = 62;
	
	function encode($decNum)
	{
		$base = $this->baseInt;
		
		$myStack = array();

		$remainder = 0;

		$base62Str = $this->base62StrVar;

		do 
		{
			
			$remainder = bcmod($decNum, $base);
			
			array_push($myStack, $remainder);
			
			$decNum = bcdiv(bcsub($decNum, $remainder), $base); 
			
		}
		while($decNum > 0);
		
		$binNum = '';

		while(count($myStack) > 0)
		{
			
			$binNum.= substr($base62Str, array_pop($myStack), 1);
		}

		return (strlen($binNum) >= 6)?$binNum: str_pad($binNum, 6, 0, STR_PAD_LEFT);
	}
	
	function decode($baseNum)
	{
		
		$base62Str = $this->base62StrVar;
		
		$base = $this->baseInt;

		$hashLen = strlen($baseNum);
		
		$decNum = '';
		
		for($i = 0; $i < $hashLen; $i++)
		{
			$decNum = bcadd($decNum, bcmul(bcpow($base, $i), strpos($base62Str , substr($baseNum, $hashLen - $i - 1, 1))));
		}
		
		return $decNum;
	}
	
}

Using the two simple encode and decode functions we can convert base 10 integers to base 62 representation and vice versa.

You can see the example below:

require_once("lib/class.MyBase62Converter.php"); 

$encoder = new MyBase62Converter();

echo "<br />";

echo PHP_INT_MAX." encoded is ".$encoded = $encoder->encode(PHP_INT_MAX);

echo "<br />";

echo $encoded." decoded is ".$decoded = $encoder->decode($encoded);

echo "<br />";
 
$largeNum = bcpow(62, 6) - 1; 

echo $largeNum." encoded is ".$encoded = $encoder->encode($largeNum); 

echo "<br />"; 

echo $encoded." decoded is ".$decoded = $encoder->decode($encoded); 

echo "<br />"; 

$veryLargeNum = bcpow(62, 7) - 1; //getting 0 due to num expressed in scientfic exponential notation 2.183401055849E+14 

echo $veryLargeNum." encoded is ".$encoded = $encoder->encode($veryLargeNum); 

echo "<br />"; 

echo $encoded." decoded is ".$decoded = $encoder->decode($encoded); 

echo "<br  />"; 

$max_num = 99999999999999; 

echo $max_num." encoded is ".$encoded = $encoder->encode($max_num , 62); //99999999999999 

echo "<br />"; 

echo $encoded." decoded is ".$decoded = $encoder->decode($encoded); 

echo "<br />"; 

$new_num = 63; 

echo $new_num." encoded is ".$encoded = $encoder->encode($new_num , 62);  

echo "<br />"; 

echo $encoded." decoded is ".$decoded = $encoder->decode($encoded);

The result of code execution is given below: